
Shelf Testing: how to build the spreadsheet (XLSX file) for a shelf upload
Your shelf is built from one spreadsheet of products, plus the pictures of those products.
#Start here
Before you begin you need three things:
- A list of your products.
- One picture of each product, saved as JPEG or PNG.
- Excel or Google Sheets, to edit the spreadsheet.
The spreadsheet app calls the whole file a workbook, and calls each tab in it a sheet. This guide uses those two words.
#The two buttons
Open your shelf study and go to the study editor. On the shelf toolbar you will see:
- Add Products adds products one at a time, by hand.
- Import from XLSX builds the whole shelf from a spreadsheet. Use this one.
The import window takes .xlsx and .xls files. It also links a ready sample workbook, named Download sample XLSX structure.
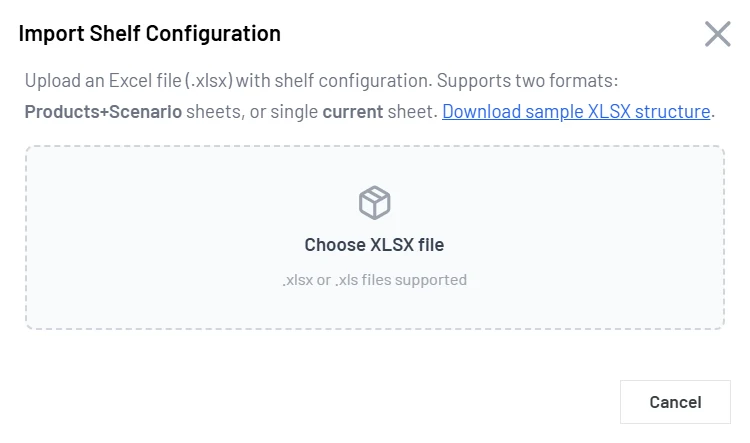
Choose Choose XLSX file and pick your workbook. The window then shows what it found before anything changes in your study.
#The easy way to start
Download these two files. They match the example further down this page, so you can run a full import before you build your own file.
- The example workbook (20 KB)
- The example product pictures (32 KB)
Import them once. If a shelf appears, you know your setup works, and you can copy that workbook and replace the rows with your own.
#Four things people get wrong
- The column names. The importer looks for exact names. Do not rename them, and do not add capitals.
- The bay numbers. They decide how many bays you get and which bay is on the left.
- The picture file names. The name you type in the sheet must match the file name inside your ZIP archive.
- Which price column you fill in. The tag under each pack reads
reference_pricein the Scenario sheet. A price in theProductssheet does not reach the tag.
#What the words mean
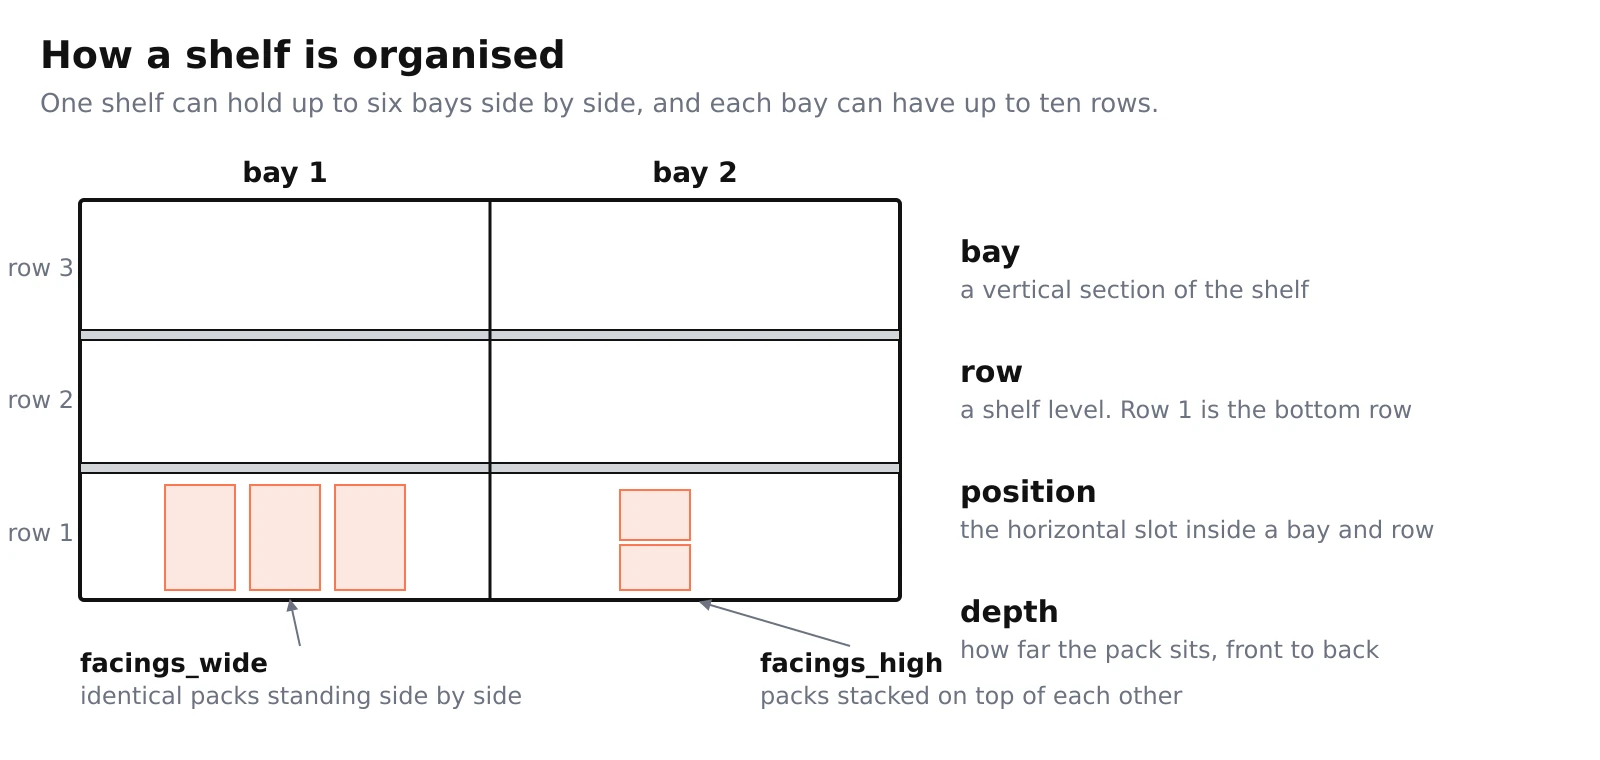
- Sheet. One tab of the workbook. This guide uses three:
Products,Scenario 1andSettings. - Bay. One upright section of shelving, like one section of a supermarket aisle. A shelf can hold up to six bays side by side.
- Row. One shelf board inside a bay, where products stand. Each bay can have up to ten rows.
- Position. Where a product sits along the row, counting from the left. Think of it as a numbered slot.
- Facing. One pack facing the shopper. Three facings of the same product means three packs standing side by side.
- Stack. Packs of the same product sitting on top of one another.
#Which layout do I need?
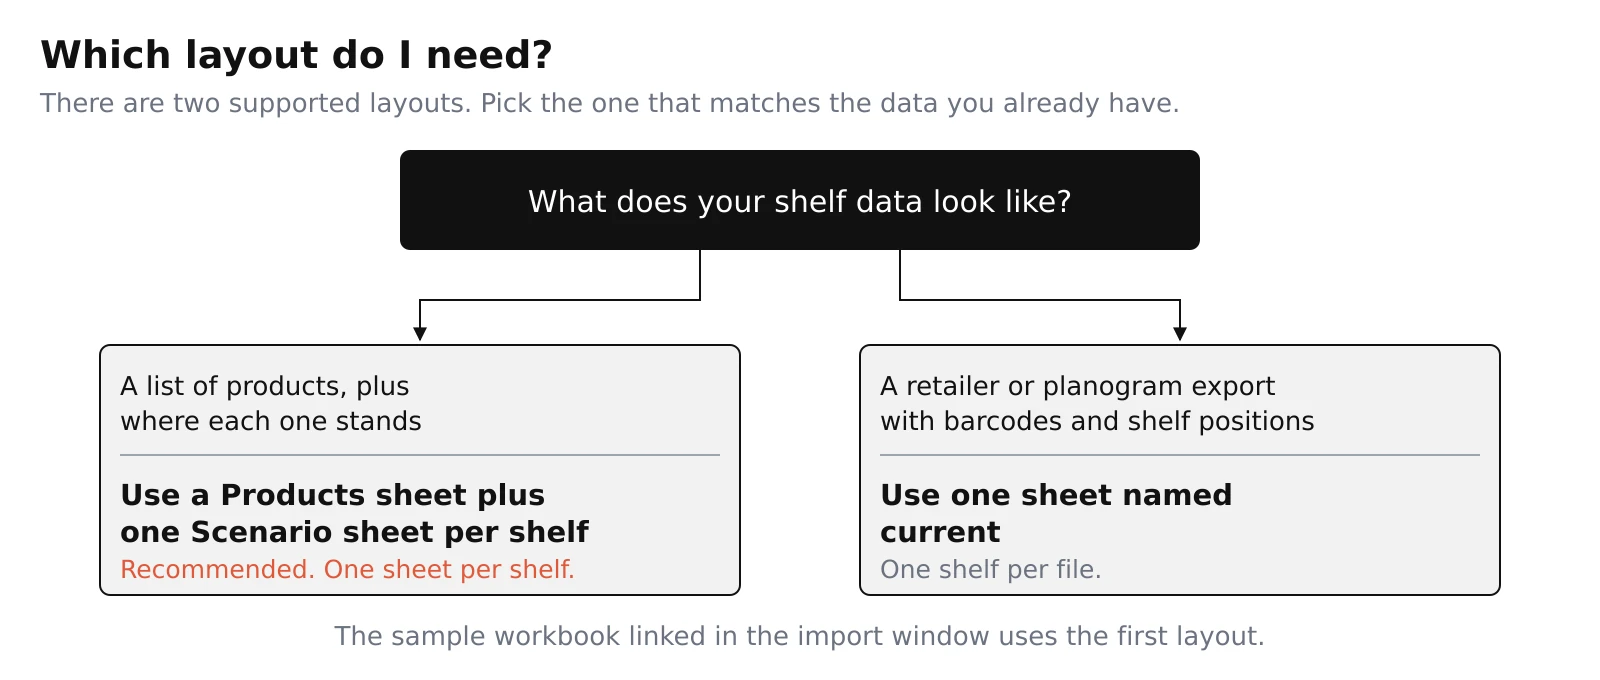
The importer understands two shapes of spreadsheet, and nothing else.
| Spreadsheet shape | Use it if | Sheets you need | Shelves it makes |
|---|---|---|---|
| Products plus Scenario sheets | You have a product list and you decide where each product stands | Products, then Scenario 1, Scenario 2 and so on |
One shelf for each Scenario sheet, up to six |
One sheet named current |
Your planogram (the shelf layout document a retailer uses) or export already lists barcodes and shelf positions | current |
One shelf for the whole file |
Most people use the first shape, so this guide follows it. The second shape is described at the end under "If your shelf comes from a retailer".
#Try the example first
The downloadable workbook has two sheets already filled in. Here they are.
The Products sheet
| id | name | price | image_url | height | has_transparent |
|---|---|---|---|---|---|
| cereal-a | Cereal A 500 g | 3.49 | cereal-a.png | 300 | 1 |
| cereal-b | Cereal B 750 g | 4.19 | cereal-b.png | 340 | 1 |
| drink-x | Juice X 1 l | 2.99 | juice-x.png | 260 | 0 |
| snack-y | Snack Y 120 g | 1.79 | snack-y.png | 180 | 0 |
The Scenario 1 sheet
| product_id | shelf | bay | position | facings_wide | facings_high | reference_price |
|---|---|---|---|---|---|---|
| cereal-a | 1 | 0 | 0 | 3 | 1 | 3.49 |
| cereal-b | 1 | 0 | 3 | 1 | 1 | 4.19 |
| drink-x | 1 | 1 | 0 | 1 | 1 | 2.99 |
| snack-y | 2 | 0 | 0 | 2 | 2 | 1.79 |
Here is what the import window shows for that workbook, before you confirm anything:
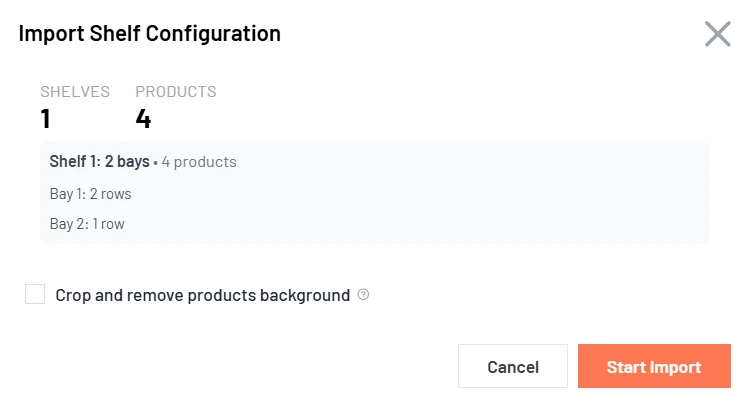
What that produces, in plain words:
- Bay 1 has two rows, because the highest row number used there is 2. The bottom row holds Cereal A as three packs side by side, then Cereal B next to it. The row above holds Snack Y as two packs wide and two packs high.
- Bay 2 has one row, because only row 1 is used there. It holds Juice X.
- Each pack is sized from its
heightnumber, so Cereal B looks a little taller than Cereal A. - Each price tag reads the
reference_pricefor that row, so the tags say 3.49, 4.19, 2.99 and 1.79. - The four picture files go into one ZIP archive, because the sheet refers to them by file name.
#Build your own file
Copy the example workbook, then replace the example rows with your own. Keep the sheet names and the column names exactly as they are.
#Sheet 1: Products, your product list
One row per product. The first row of the sheet holds the column names, and they must keep these exact names, in lower case.
| Column name | What to put in it | Needed? | Example |
|---|---|---|---|
id |
A short code you make up for the product. Use up to 50 characters, and make every code different | Yes | cereal-a |
name |
The name you want shown on the shelf label | Yes | Cereal A 500 g |
image_url |
The file name of the picture, or a web address starting with https:// |
Yes | cereal-a.png |
price |
A price kept with the product. The shelf tag does not read this column | No | 3.49 |
height |
How tall the pack really is. Use any unit you like, as long as you use the same one for every product. The importer uses these numbers to decide how tall each pack looks next to the others. Leave the column out and every pack shows at full size | No | 300 |
has_transparent |
Put 1 if the picture should have its background removed, otherwise 0 or leave it blank |
No | 1 |
#Sheet 2: Scenario 1, where each product stands
One row for each product on the shelf. For a second shelf, add another sheet named Scenario 2, and so on.
| Column name | What to put in it | Needed? | Example |
|---|---|---|---|
product_id |
The same code you used in the id column of the Products sheet |
Yes | cereal-a |
shelf |
Which row the product stands on, counted from the bottom. Row 1 is the bottom row |
Yes | 1 |
bay |
Which bay it stands in. Leave it blank to use the first bay | No | 0 |
position |
Which slot along the row, counting from the left and starting at 0 |
Yes | 0 |
facings_wide |
How many packs stand side by side. 1 or more | No | 3 |
facings_high |
How many packs are stacked on top of each other. 1 or more | No | 1 |
height_percent |
Only if one product should look taller or shorter than its height says. Write a percentage, for example 90 |
No | 90 |
depth |
How far the pack sits front to back, used by the 3D view. 0 or more | No | 1 |
item_spacing |
Extra space between the packs of one product. 0 or more | No | 0 |
reference_price |
The number shown on the shelf tag. Any number from 0 upwards. A comma or a full stop both work, so 1.99 and 1,99 mean the same. Leave the column out and every tag shows 0 |
No | 3.49 |
reference_name |
A note carried along with the row. Nothing on the shelf reads it | No | Promo pack |
Where the shelf price comes from. The tag under each pack takes its number from reference_price in the Scenario sheet. The price column in the Products sheet does not reach the tag, so a shelf with full prices written there still shows 0 on every tag. The one exception is a file imported as a single current sheet, described under "If your shelf comes from a retailer", where the Price column in that sheet is the one used.
Two things to remember:
- Only products listed here appear on the shelf. A product in the
Productssheet that you never place is not added to the study. - A pack that is too tall for its row is made smaller until it fits.
#Sheet 3: Settings, only if you want to change something
Leave this sheet out and the shelf uses sensible defaults. It has three columns: setting, value, and an optional shelf. Leave shelf empty to change the setting on every shelf, or put a shelf number to change it on one Scenario sheet only.
The settings people change most:
| Setting | What it changes |
|---|---|
theme |
The shelf background: default, wooden, grocery, cooler, freezer or none |
show_prices |
Show price tags or not: 1 or 0 |
currency |
The text on the price tag, for example $ or EUR |
currency_position |
Whether the currency goes before or after the number |
shelf_duration |
How long the shelf stays on screen, in seconds |
bay_widths |
How wide each bay is, separated by semicolons, for example 40;60. The numbers do not have to add up to 100 |
Every other setting is listed in "Reference: all the settings" at the end of this page.
#How bays work
One shelf can hold up to six bays side by side, and each bay can have up to ten rows.
You do not have to start numbering at 1. The importer takes the lowest number you used in that sheet, treats it as the first bay, and counts up from there. So all three of these sheets give you the same shelf.
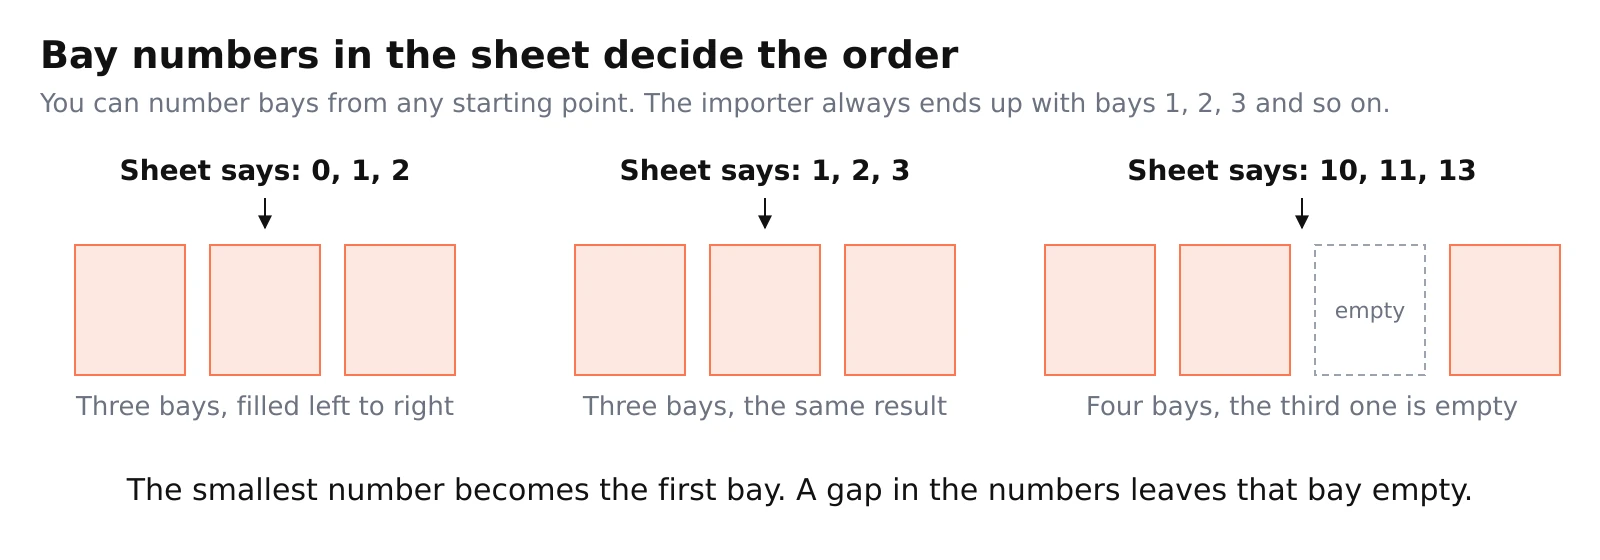
| Numbers you typed | Bays you get | Why |
|---|---|---|
0, 1, 2 |
Three bays | Filled from left to right |
1, 2, 3 |
Three bays | The same shelf, because 1 becomes the first bay |
10, 11, 13 |
Four bays | The third bay is empty, because 12 is missing |
Four rules:
- Leave a
baycell blank and the product goes into the first bay. - A missing number leaves that bay empty. This is how you leave a gap in the shelf.
- The lowest number sits leftmost, so the numbers decide the left to right order.
- Two products cannot share the same bay, row and position.
Each Scenario sheet is counted on its own, because each one is a separate shelf.
To change bays before importing, edit the bay column in the sheet, then use bay_widths for the widths and the bay settings in the reference section for the rows.
To change bays after importing, use the shelf editor: the Bays row shows each bay and its number of rows, Add bay adds another section, the bin icon removes one, and the handles on the shelf change bay widths and row heights.
#The product pictures
Every product needs a picture, and you can give the picture in two ways.
What you put in image_url |
What to do |
|---|---|
A file name, for example cereal-a.png |
Put all those files into one ZIP archive and upload it at the second step of the import. The importer matches by file name, and capital letters do not matter, so Pack-A.PNG in the ZIP is found by pack-a.png in the sheet |
A web address starting with https:// |
The picture is taken from the web. It does not need to be in the ZIP. You can mix both ways in one file |
Rules for the pictures:
- Each picture must be JPEG or PNG, and 30 MB or smaller.
- No side may be longer than 15000 pixels, and at least one side must be 50 pixels or more.
- Do not put two files with the same name in one ZIP archive. Rename one of them and update the sheet.
The example pictures archive follows these rules, so you can look inside it to see a working example.
#The most you can have
| What | Limit |
|---|---|
| Shelves in one study | 6 |
| Bays on one shelf | 6 |
| Rows in one bay | 10 |
| Products in one study | 500, counting the products you place on a shelf and any products already in the study |
#When the import complains
The import window lists every problem it finds, and tells you the sheet and the row. It will not start until the serious ones are fixed.
| What you see | Why | What to do |
|---|---|---|
| A required sheet is missing | The workbook has no Products sheet, no Scenario N sheet and no current sheet |
Check the sheet names, including the spelling of Scenario 1 |
| A required value is missing | A code, name, picture or position cell is empty | Fill the cell, or delete the row if the product is not on this shelf |
| A value is not a whole number | A position or a bay holds something like 2.5 |
Use whole numbers. 2.0 is fine, 2.5 is not |
| The same bay, row and position is used twice | Two products want the same slot | Move one of them to a free slot |
| A product code is used twice | Two rows share an id, or share the first 50 characters |
Give every product its own code |
| A bay number is 7 or higher | You used more than six bays | Split the shelf over two Scenario sheets, or use fewer bays |
| Pictures are missing from the ZIP | A file name in the sheet has no matching file in the archive | Add the file, or use a full https:// address instead |
| Two files in the ZIP share a name | The archive holds two files with the same name | Rename one of them and update the sheet |
| The study would go over 500 products | The study is close to the limit | Remove some products, or use another study |
Some notes are only warnings and do not stop the import. They appear when a product code is longer than 50 characters, when a product ends up unusually tall, or when a Scenario sheet number is missing.
#Step by step
- Download the example workbook, and keep its sheet names and column names.
- Replace the rows in the
Productssheet with your own products. - Replace the rows in the
Scenario 1sheet with where each product stands, and with the price its tag should show inreference_price. - Add a
Scenario 2sheet for a second shelf, and so on. - Add the
Settingssheet only if you want to change something. - Save the file as
.xlsx. - Put every picture that the sheet names by file name into one ZIP archive, or use
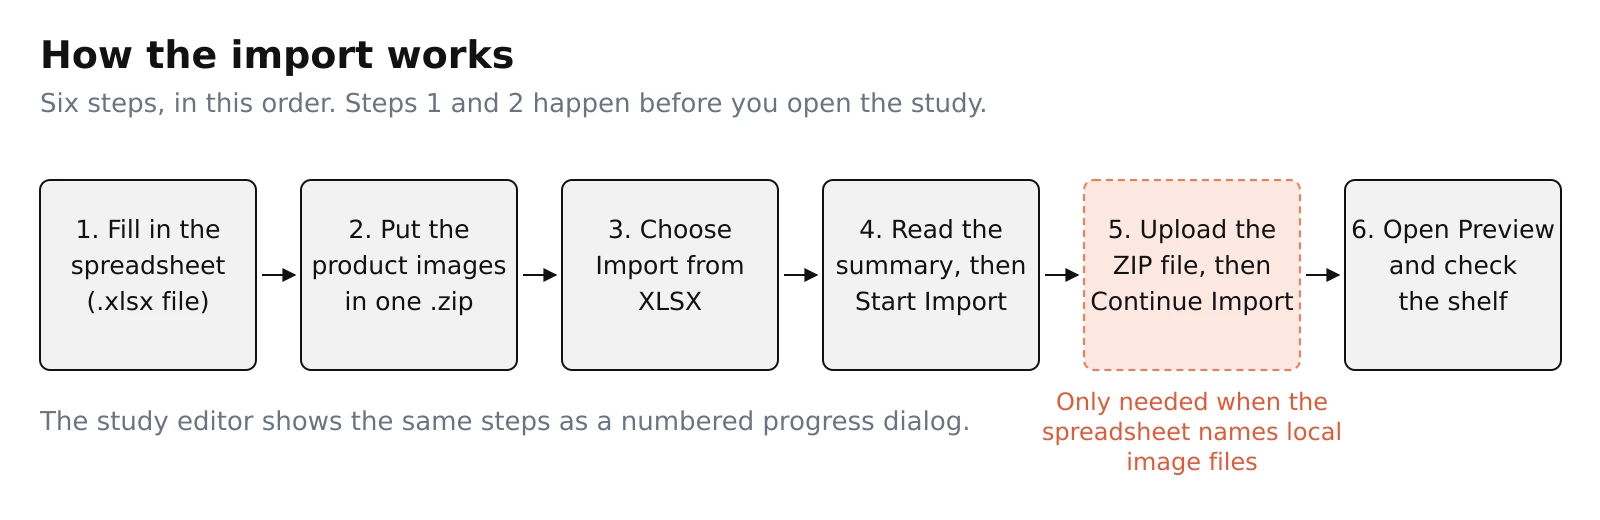
https://addresses and skip the ZIP. - In the study editor choose Import from XLSX, pick your file, and read the summary. It shows how many shelves, how many products, and each bay with its number of rows.
- Fix anything it flags, then choose Start Import.
- When it asks for the pictures, upload the ZIP and choose Continue Import.
- Open the shelf preview and adjust anything by hand.
If the import stops halfway, it remembers where it got to. When you come back it asks for the ZIP again and carries on.
#If your shelf comes from a retailer
Some retailers give you a planogram export that already lists barcodes and shelf positions. If your file looks like that, you can import it directly as one sheet named current. One file gives you one shelf, and column names here are read without caring about capitals.
| Column | What it holds | Needed? | Example |
|---|---|---|---|
Shelf |
A letter and a number, for example A1. The letter is the row, where A is row 1 and B is row 2, and the number is the position in that row, counting from 1 |
Yes | A1 |
UPC |
The barcode number. It is also used to match the picture file | Yes | 3760304183485 |
Brand or Variant name/description |
The product name. If both are filled in, the variant description wins | At least one | Cereal A 500 g |
Bay |
The bay number | No | 1 |
Price and Currency |
The price, and the currency written as a code such as EUR or USD. The code is shown as its symbol |
No | 3.49 and EUR |
Number of facings, Number of stackings, Number of depths |
The same as facings_wide, facings_high and depth in the other layout |
No | 3 |
Height |
The pack height, used in the same way as in the other layout | No | 300 |
Pictures for this layout must be named {Shelf}_{UPC}.1.png, for example A1_3760304183485.1.png.
#Reference: all the settings
Use these in the Settings sheet. The shelf column is optional: leave it empty to apply the setting to every shelf, or put a shelf number to apply it to that Scenario sheet only.
| Setting | What it does |
|---|---|
shelves_count |
How many rows a bay has, when you do not set them one by one |
bay_1_shelves_count, bay_2_shelves_count, and so on |
How many rows a single bay has. Bay 1 is the leftmost bay after import |
bay_1_row_heights, bay_2_row_heights, and so on |
How tall each row in a bay is, from top to bottom, separated by semicolons, for example 30;30;40. Give one number per row |
bay_widths |
How wide each bay is, separated by semicolons, for example 40;60. The numbers do not have to add up to 100 |
shelf_thickness |
How thick the shelf boards look |
theme |
default, wooden, grocery, cooler, freezer or none |
show_prices, show_labels, force_hq_images, show_shelf |
1 to turn on, 0 to turn off. show_3d does the same as show_shelf |
currency |
The text shown on price tags, for example $ or EUR |
currency_position |
before or after the amount |
price_tag_size |
small, medium or large |
decimal_places |
0 or 2 |
shelf_duration |
How long the shelf stays on screen, in seconds |
shelf_variant |
previewing, finishonpurchase or finishoncheckout |
shelf_engine |
How the shelf is drawn: basic, optimized-50 or pro |
grid_size |
The size of the invisible grid that products snap to: default or large |
#Related
- Shelf Testing Report: predicted attention explains what the shelf report adds once participants have taken part.